Notes on creating Microsoft Office data
Order flow
STEP1
After the order is completed, you will need to upload the Office data.
STEP2
We will check the data. If there is no problem with the data, conversion from Office data to print data is performed.
STEP3
As soon as the conversion is complete, we will prepare a PDF for proofreading (confirmation). We will send you an e-mail “Proof PDF”, so when you receive it, check the Proof PDF.
STEP4
Reply “Approve” if there is no problem in printing with the proof PDF content, or “Do not approve” if you want to modify or resubmit.
STEP5
Printing will proceed as soon as we receive an "Approve" response. If it takes a few days to get an “Approve” response, delivery date could be deleyed.
Additional business days
+1 business day is added for data conversion.
Conversion fee
| Unit | Fee |
|---|---|
| Per page (one side) | $6 |
Correction is a separate fee
If we work on other than conversion (correction of characters, creation of fills, etc.) at our company, a separate correction fee will be required.
Data creation method (Word, PowerPoint)
1. Set the document size
From File-> Page Setup-> Change Paper / Margins, set the size to "Paper Size + 0.25inch" ("Size at creation" in the table below).
(* Because it is necessary to create an additional 0.125inch bleed around so that the background is not interrupted)
| Paper | Size inch |
Creation size inch |
Contents area inch |
|---|---|---|---|
| A1 | 33.11x23.39 | 33.34x23.62 | 32.87x23.14 |
| A2 | 16.53x23.39 | 23.62x16.77 | 23.14x16.29 |
| A3 | 11.69x16.53 | 16.77x11.92 | 16.29x11.45 |
| A4 | 8.27x11.69 | 11.92x8.5 | 11.45x8.03 |
| A5 | 8.27x5.83 | 8.5x6.06 | 8.03x5.59 |
| A6 | 5.83x4.13 | 6.06x4.37 | 3.88x5.58 |
| A7 | 2.91x4.13 | 4.37x3.14 | 2.66x3.88 |
| Letter | 8.5x11 | 8.75x11.25 | 8.25x10.75 |
| Paper | Size inch |
Creation size inch |
Contents area inch |
|---|---|---|---|
| B1 | 27.8x39.4 | 40.78x28.89 | 40.31x28.42 |
| B2 | 19.7x27.8 | 28.89x20.51 | 28.42x20.03 |
| B3 | 13.9x19.7 | 20.51x14.56 | 20.03x14.09 |
| B4 | 9.8x13.9 | 14.56x10.53 | 14.09x9.88 |
| B5 | 6.9x9.8 | 10.53x7.4 | 9.88x6.92 |
| B6 | 4.9x6.9 | 7.4x5.27 | 4.67x6.68 |
| B7 | 3.5x4.9 | 5.27x3.81 | 3.21x4.67 |
| 5.5x8.5 | 5.5x8.5 | 5.75x8.75 | 5.25x8.25 |
2. Make a guide for layout
Select Insert -> Shape -> Rectangle and place an appropriate rectangle on the document.
Right-click the placed figure, select "Placement and Size", and set the size to exactly "Paper Size" ("Size" in the table above).
By placing the resulting figure in the center of the document and selecting Format → Fill figure → No fill, a frame indicating “the original paper size” is created.
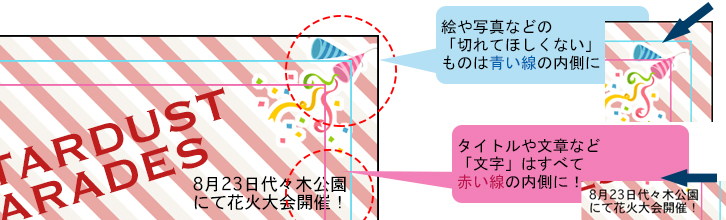
By laying out within this border line, it is possible to prevent the situation where important information is laid out in the "painted" part that is cut off when printing, so that it will be cut off / invisible when printing Can be.
3. Make a guide for fonts (characters)
Create a rectangle using the same procedure as in step 2, and set the size to "paper size you want to create"-6mm ("character insertion range" in the table above). (* In order to prevent the character from being cut by putting the character 3mm inside from the original size, the character is cut)
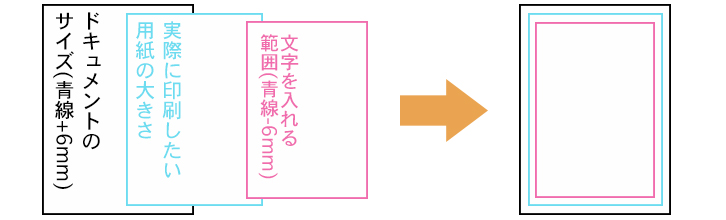
4. Layout the printed document
Make the design fit in the frame of "the size of the paper you actually want to print" that you made earlier, and make sure that all the characters and sentences fit in the frame of "the area to put the characters".
If a color or pattern other than white is used for the background, cover the entire document exceeding the "size of the paper to be actually printed". (If there is a margin, white border may remain when printing *Bleed)
5. Make sure each design fits in the frame
- Are all the images and text contained in the frame?
- If you want to perform processing such as folding or creasing as an option, is there a space of 1 mm or more around the processing position?
- Does the background cover the entire document with no margins?
Check the items in the checklist for other data incompletion and submit the data.
Attention
Only Windows version of Office is supported
Office data created by non-Microsoft software such as the Mac version of Office, Open Office, and Kingsoft Office are not supported.
Please be careful about garbled characters and missing photos
When converting the data, errors such as garbled characters or missing photos may occur. Please check the PDF for proofreading sufficiently on My Page, and answer the progress.
The color changes
Office software cannot convert to CMYK, so we will also convert to CMYK when converting data at our company. Please note that converting RGB to CMYK will significantly change the color. For details, see also about color mode.
Font changes
If we do not have the font you used when creating the data, the typeface at that location will change. Be sure to include an output sample.