Notes on creating Illustrator data
Add Cropmarks
Setup steps
- Create a square object of the same size as the finished size
- Click to select and change "Fill" and "Line" to transparent
- Click "Object" → "Create trim mark" from Illustrator menu
- A crop mark (trim mark) is created around the object
- Select the created crop mark (trim mark) and change "Line" to 100% of C, M, Y, K, and "Line Width" to 0.3pt
You can Download Templete Here to start working on artwork!
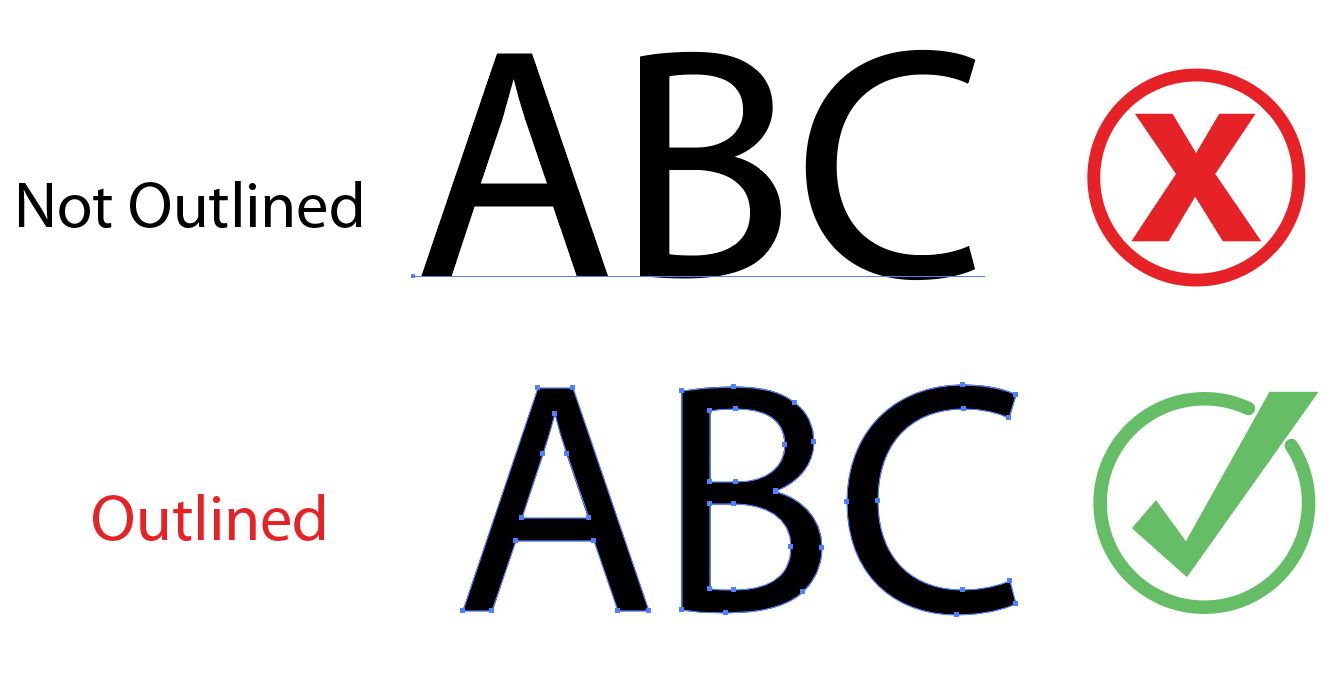
All the characters must be outlined
If you print with data that is not outlined, the typeface will change and the text filling will change drastically. Even if a computer contains the same font, the character padding may not be reflected, so please outline all characters regardless of Windows or Macintosh.
The customer will be responsible for reprinting if submitting the non-outlined data cause some issue.
Setup steps
- Select all objects
- Click "Format" → "Create Outline" from the Illustrator menu
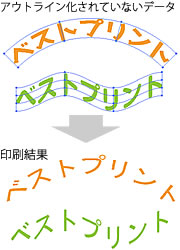
Text before Illustrator 10 may be garbled (legacy text)
A text object created in Illustrator 10 or earlier is opened in CS or higher without being updated, and is called "legacy text".
Once the file is opened as legacy text, the font cannot be detected by font search.
In addition, if data with legacy text remaining is submitted, it may cause garbled characters.
Legacy texts are not subject to data check, so if you want to reprint due to garbled characters, you will be charged.
In order to prevent such garbled characters, please outline all characters before submitting.
When using the envelope function
Characters using the envelope function cannot be outlined using the above procedure.
Perform one of the following operations.
- Outline characters before using envelopes effect
- After using the envelope, Perform "Extension" in the "Object" "Envelope" menu
- Use "Warp" in the "Effect" menu instead of the envelope, then Outline it

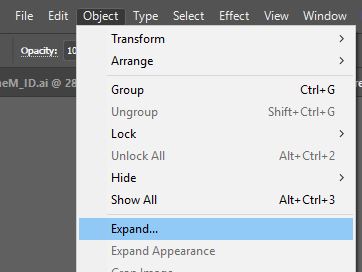
When using the graph creation function
The characters of the graph created using the graph creation function will not be outlined even if you select "Outline". To make this character outlined, you would need to ungroup.
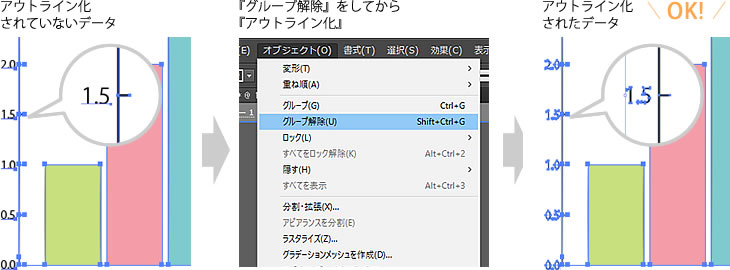
When using the pattern function
The characters of the graph created using the graph creation function will not be outlined even if you select "Outline". To make this character outlined, you would need to ungroup.
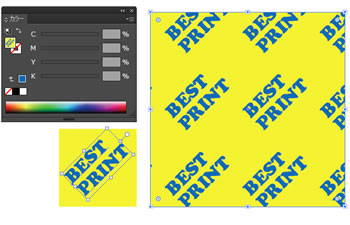
If it has already been patterned, please do "Outline" after performing "Expand" from the "Object" menu.
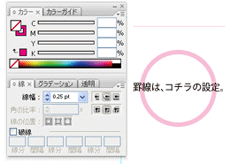
For the ruled lines, set the color to "Line"
If the color of the ruled line is set to "Fill", it will be displayed on the printer's print output and monitor, but it cannot be printed on our printer.
The file name of the layout image (link image) must be alphanumeric.
When placing an image in Illustrator, make sure that the file name of the image is alphanumeric.
E.g.) "photo-006.psd" "page02-flower.eps"
If Japanese, double-byte characters, or special symbols are used in the file name, garbled characters may occur and the submitted data may not be displayed correctly. In this case, the delivery date may be delayed because it takes time to confirm.
Save in ai, eps or PDF / X-1a format
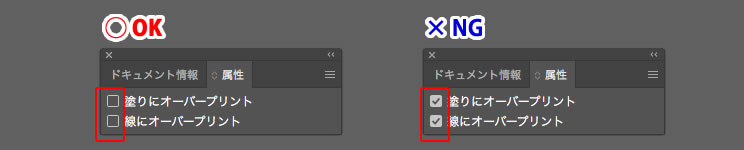
Do not use overprint
Do not check "Overprint on fill" or "Overprint on line" for all objects. When overlaying colors, use a transparency effect such as "Multiply".
Before submitting the document, switch the display in “View> Overprint Preview” and check if there is any part where the color has changed, or if there are any objects that have disappeared.

| Normal View | Overprint Preview | |
|---|---|---|
| With overprint setting | 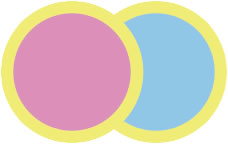 &*#^$^% 1@!* &!%@H@J!6 *^&%$#&! %%# !&#@^% !^@$# **^%#$&^!* @^! &#h2^% !*@%# **njhdk. |
 Objects with overprint settings may change their appearance and color when printed. |
| No overprint setting Multiplication |
 |
 |
| White object |  |
 Please note that if overprinting is set for a white object, it will disappear during printing. |
Unlock all layers and all objects
Unlocking layers Setup steps
- Click "Window" → "Layer" from the Illustrator menu. The layer window appears
- If the padlock mark is displayed to the left of the layer name, click once
- If the padlock symbol is not displayed, the lock is released.
Unlock all objects
- Click "Select" → "Select All" from the Illustrator menu.
- Click "Object" → "Unlock All" from the Illustrator menu.
Do not use spot colors
Spot colors cannot be reproduced. If the document is submitted with the spot color settings remaining, the color will change. Be sure to convert to process color before submitting
Other notes
If you do not want to “embed” the linked image, please submit the image data as well.